
|
|
Example Combat
|
|
Example Combat First Time Players Please Note: This example combat is extremely long, and involves as many rules as we could put into a battle this size. This example looks gigantic but believe us, it isn't. This game, if played like we portray it, where the units just charge at each other with little use of tactics, would take first time players roughly 15 minutes to play. Players that have played Shellshock about three times, can play it in 10 minutes or less. The idea in Shellshock is that you HAVE to use strategy. You have to hide, you to have to worry about where you are going to move. That is what actually takes the most time, you trying to out wit your opponent. Strategy is primary. Things blowing up is just the result of good or bad planning. Not that seeing things go kablooey isn't darn fun in and of itself. Let us set up the game: Prepping for Combat First we need to decide what units will be playing. The UN side has chosen 1 Bison-GP, 1 Bulldog-GS, and 2 Prescott-9t 's (A+B). As is typical the UN pilots have the minimum skill required to pilot their units. Also as is typical of the UN, the gunnery skills of all the gunners is +3. Fill this in the gunnery skill area besides the appropriate pilots and gunners near the top of the "Manifest" section of the records sheet. All other information should be filled out. The Rebel forces have 2 Masons (1+2) and 1 Wallace. As is typical the Rebels employ higher skilled pilots than necessary. The Masons have MSRP (Manufacturers Suggested Minimum Piloting Skill) of 1. The Mason pilots have piloting skills of 3, so all of their Defense values are automatically raised by 2. The Wallace's MSRP is 3, but the Wallace Pilot has a piloting skill of 8, making all of his defense values increase by 5. Beside the Defense Values there is a blank space. Add the bonus from high piloting to the numbers and fill in the space. For example the side Missile Defense Value of the Mason is normally 5, with the +2 it turns into a 7. Write 7 in the blank space to the left of the Side Missile Defense number. Do the same for all the other Defense Values. The Mason has three ammunition bins. Fill one with Sabot rounds, and one with HEP rounds. Fill the third with standard ball ammo. Make sure you fill in the Damage, Shock and Penetration areas. The UN tanks have had their ammo bins filled out already because UN tanks generally always carry the same ammunition compliment. The Masons also have hard-points that need to be filled in. The Masons have one 20 slot hard point and one 5 slot hardpoint. Each Mason will usually load 3 Type V Rocket Pods and 2 Type 1 Rocket Pods. Type V's do 5 Damage, and no Shock or Penetration. Type 1 RP's do 1 dice of Damage and 4 dice of penetration. Make sure you write down the ECV's of the Rocket Pods and add them to the Total ECV of the Unit. All the units have their standard load outs filled in and are ready to go. Now all we need are counters to represent the units that will be in play, initiative chits, dice and a kitchen table. For Counters we will use the pop-counters available on the web site. For initiative chits we will use 7 pennies. Label one R and the rest 1-6 with permanent marker. We will need 2d10 (two 10 sided dice), one black and one green, 2d6 any color and 3 average dice. (Please see the "What you need to play" section of the book.) In this example we will be using the 12 sided average dice. The Average dice should be Red, White and Blue. Just to let you know average dice are used to make the game very quick. If you like Shellshock at all, we highly recommend buying or making some average dice. Play is literally twice as fast. (Justin likes rolling out three 12 sided average dice, I like rolling one 6 sided average dice and multiplying across Damage, Shock and Penetration) Now for the playing surface, following is a picture of the map we are using in this example combat. Please replicate this any way you wish (Again, check the "What you need to play" section of the book) The Entire Rebel force is motionless at the beginning of the turn and the entire UN force is moving at a speed of 8. (Typically at the beginning of a game players can move at any speed they wish.) TURN ONE: Initiative Phase It's time to pick the initiative chits. Since the Rebel side has less units, they get to pick first. As a player picks a chit, they announce which number they got, place and place the chit beside the unit of their choice before the next player picks his chit. This is the result of the pulls Chit # Unit 1 Mason #1 2 Prescott A 3 Prescott B 4 Mason #2 5 Bison 6 Bulldog R Wallace Movement Phase The unit that receives Chit #1, which is Mason #1, gets to move. The Mason chooses to remain in place. Chit #2 is on Prescott A. The Prescott A is already moving 8 and declares that he is going to keep going at that speed. The Prescott A is going to climb a level one inclination. All treaded tanks must expend two movement points to travel across a level one inclination. The Prescott crosses the ridge and goes down the decline on the other side. It also costs a treaded tank 2 movement points to go down a level 1 inclination. So, even though the Prescott has a speed of 8, the Prescott A only physically moves 6 inches. Chit #3 is on Prescott B. Prescott B does the same as A. Chit #4 is Mason #2, the player decides to not move the second Mason. Chit #5 is the Bison. The Bison chooses to increase its speed to 11. Walkers have no movement penalty for traveling across 1 level inclines so the Bison actually moves a full 8 inches. The Bison decides to drift to the left, running around his slower moving comrades in the tank. It does cost two movement points to drift so the Bison while traveling at a speed of 11, only physically moves 10 inches. The superior agility of Walkers allow great speed over all terrain. Chit #6 is the Bulldog, the only air unit in this example game. The Bulldog is currently traveling in a straight line at 8. The Bulldog pilot announces he is going to accelerate to 16. The Bulldog travels forward 2 inches then banks to the right. At a speed of 16 the Bulldog is not supposed to turn until he travels forward 8 inches, but since he was traveling in a straight line the last turn, he has already moved forward 10 inches so can make the turn with no penalty. The Bulldog travels another 7 inches and needs to turn again to the left to fly straight between the hill and the tree. Since the Bulldog has not yet traveled a full 8 inches and is turning on inch tighter than he should, he is forced to roll one slip dice. He rolls 1d6 and gets a 4. He has equaled the slip dice. He does not slip. Chit #7 is the Wallace. The Wallace accelerates to eight, runs up the hill and behind a tree. Reaction Phase Only two units can see each other and their turrets are already facing each other and are within each others firing arcs. Let the fighting begin. COMBAT!!! (The moment you've been waiting for) The second Prescott and the second Mason can see each other directly and are facing each other. The Prescott B is at a range of 23 to the Mason. The Prescott pilot fires his cannon, a Ballistic weapon, 1 grenade launcher (since he is firing other weapons besides the grenade launcher, he can only fire 1 grenade launcher instead of two) which is an Indirect weapon, and his hyper-velocity gattling cannon, an Energy weapon. Some may be wondering how this is an Energy weapon. Hyper-Velocity cannons fire so may rounds, traveling so quickly, with such accuracy, they earn the ability to be considered as accurate as an Energy weapon like a laser. The Mason's Ballistic defense value from the front is 11, the Indirect is 13 and his Energy is 8. (Remember, the Mason's Ballistic, Indirect and Energy Defense values are normally 9, 11 and 6, but the better pilot in the Mason makes all of these values higher by 2.) Each full foot is a +1 to the To Hit roll. So for the Prescott Pilot to hit with his cannon he needs to roll a 12, to hit with his grenade launcher he needs to roll a 14 and to hit with his hyper-velocity cannon he needs a 9. The Prescott rolls 2d10 and gets a 5 and a 3. With his gunnery skill of +3 this adds up to an 11, enough for energy weapons to hit, but not enough for the ballistic and indirect weapons. The hyper-velocity cannon does 5 Damage, 5 Shock and 10 Penetration. The gunner rolls RED, WHITE AND BLUE (This is where we call the dice for Damage=RED, Shock=WHITE and Penetration=BLUE.) and gets 4/6/5. Multiply this against the D/S/P and this yields 20 damage, reducing the Mason's front armor to 130, 30 shock, which just matches the Mason's Shock, and does no internal damage, and 50 penetration against the Mason's front penetration of 37, causing 13 points of internal damage. Looking along the Internal percentage chart we see that 13 internal points just misses doing 10% internal damage, but does do 5%. The Prescott rolls percentile dice, 2d10 with the darker dice representing the 10's. On the black dice he gets a 2 and on the green dice he gets a 3. He crosses out 23 on the Internal Chart, then adds 5 (5%) and crosses out 28, then marks out all the letters in between. The letters hit are Q, which is the unit sealing, the I, which is the Satellite Uplink, and X which is the Sabot ammunition bin for the 170mm cannon. The ammunition bin is hit so there is a chance for an ammo explosion. The Mason and the Prescott gunners each roll a 1d10 to see if the ammunition explodes. The Mason has reinforced ammunition bins and an internal halon system so he gets a +2 to his ammo roll. They roll. The Mason rolls a 5, plus 2 so 7. The Prescott rolls a 7. It is a tie, so the defender wins and the Mason doesn't explode. He does lose all his Sabot ammunition though. The Commander in the Prescott is going to spot for the Gunner in the first Prescott. The first Prescott is at a range of 25. The Mason's Indirect Defense Value is 13 plus 2 for the range so the Prescott has to roll 15 or better to hit. The Prescott fires his two indirect weapons, the 120mm smooth-bore cannon and 1 grenade launcher. The Prescott rolls a 10 plus his +3 gunnery skill, which adds up to 13. A miss. Now it's the Mason's turn to fire. He fires his 170mm cannon and a 100mm grenade launcher at the Second Prescott 23 inches away. The Prescott's Ballistic Defense Value is 11 and Indirect Defense Value is 14. With a range modifier of +1, the Mason needs 15 to hit with all weapons, and at least 12 to hit with the cannon. The Mason rolls 2d10 and gets a 4 and a 9 and with his gunnery skill of 4 his roll comes out to 17, hitting with both weapons. The cannon is firing a HEP round that does 11/15/2, and the grenade does 5/4/3. Add the Damage/Shock and Penetration together and the Mason did a total of 16 Damage, 19 Shock and 5 Penetration dice. The Mason pilot rolls RED, WHITE and BLUE and gets 3/3/2. Multiply this against the D/S/P and that's a total of 48 damage, bringing the front armor of the Prescott down to 60, 57 Shock against the Prescott's Shock Threshold of 16, dealing 41 Internal damage points, and a total penetration of 10 which doesn't beat the Front penetration of the Prescott which is 25. We look along the Internal % chart and see that 41 internal damage points equals 45%. The Mason rolls percentile dice and gets 82. 82 plus 45 is 127. Since all crew members are near the top of the chart, this roll easily kills the crew of the Prescott. The Prescott is dead. Note that if the crew had survived (say from a titanium bathtub) the damage would roll over, and you would mark off from 1 through 27 on the bottom of the chart. The second Mason was spotting the 2nd Prescott for the 1st Mason, but the 2nd Prescott has been destroyed so we now go to the Aftermath phase. Remove chit #6 from the initiative chits. Replace the destroyed Prescott with something that represents rubble, or just take the destroyed Prescott off the field. Make sure all damage has been recorded for this turn. TURN TWO: Back to Initiative Pick the Chits. Normally the player with less units gets to pick first, but now both sides have the same number of units. Both players have to randomly choose who is going to go first. They decide to roll dice. (Try Rock/Paper/Scissors, it helps keep the intensity up a bit, or darts, curling, knife throwing, fencing.) The UN happens to win. The players pick the chits and these are the Results: Chit # Unit 1 Mason #1 2 Bison 3 Mason #2 4 Wallace 5 Bull Dog R Prescott #1 You will Notice that the Prescott is moving after the Bulldog. You may think to yourself why would the player do that? Well remember you are picking the chits randomly. The UN player picked number 5, not knowing if he was going to get the Red Chit, he figured he better get it on the Bulldog, since it was a fairly high number. Movement The Mason that has chit #1 uses maximum acceleration and moves forward 5. The Bison, chit #2 slows himself down to 5 and gets behind the tree. The 2nd Mason mimics the 1st. The Wallace moves forward 5 and gets behind another tree closer to the action. The Bulldog slows to 14 and turns after only 6 inches. His turn number at a speed of 14 is 7. Since he turned too sharply by 1 inch, he must now roll 1 slip dice. He rolls and gets 6. He does not slip. The Bulldog travels forward another 5 inches and decides to turn again (He wants to be able to get a side shot on the Mason.) He now rolls 2 slip dice. He gets a 4 and a 5. Again he doesn't slip. The remaining Prescott keeps traveling forward at 8. After moving 4 inches, he decides to turn. Since he has already moved forward a total of 10 inches since the beginning of the game wihout turning, he can make this turn without needing to roll. He moves forward 3 inches and decides to turn again. Now he has to roll 3 slip dice. He rolls 3d6 and gets a 3, a 6 and a 1. Crap! He slips from the one, putting him slightly out of position. Combat The UN decides he wants to do all his shooting first. The Prescott fires his hyper velocity cannon, energy, and his 120mm Cannon, ballistic, at the injured Mason which is ranged 10 inches away. The Mason's Energy Defense Value from the front is 8. There is no modifier for range. The Prescott rolls a 3. Even if adding the gunnery of +3 were enough to hit the Mason, the Prescott would have missed because rolls of 2, 3 and 4 automatically miss. (See the special rule, Even Rambo Misses Sometimes.) The pilot of the Prescott, who can see the 1st Mason, can't fire his grenade launchers because they have a minimum range of 12, which the Mason is under. The Bison Pilot fires all of his weapons at the 2nd Mason. The Bison is firing a rail gun (B) and lasers (E). (Notice he is not firing the grenade launcher because Indirect can only fire on units at least 12 inches away.) The Mason's Defense Values are 11 and 8. The Prescott rolls 2d10 and gets 8, plus with his gunnery he hits with everything. The Prescott rolls RED/WHITE/BLUE and gets 5/3/5. The combined D/S/P of the rail gun and lasers is 18/1/6. Multiply all this and we did 90 damage, reducing the Mason's front armor to 40. 3 Shock against the Mason's 30 Shock Threshold, which does nothing. A total of 30 Penetration points to the Mason's front penetration of 37, also does nothing. The Bulldog fires at the 1st Mason now from the right side rear. He fires his hypervelocity cannon. (E) and his Bolo Missile (M). (You may notice that the UN force has a lot of hypervelocity cannons on their units. We choose units that have similar weapon systems on them to make learning easier.) The Mason's Energy and Missile are 6 and 7. The Bulldog rolls an 18, plus a gunnery of 3 equals 21. The Mason's Defense systems activate to try to shoot down the missile. The Mason has all the extra energy in his tank pumped into the PAM Pod. The Bolo Missile can be hit with a 6 or better on a 1d10. It takes 2 Kreigs pumped into the PAM Pod to give it one chance to shoot down the missile. The Mason was moving 5 this turn. At a speed of 5 the Mason produces 5 Kreigs of power. The PAM pod fires twice. On one dice the Mason gets a 2, that's a miss. On the other dice he gets a 7. The Missile is destroyed. So only the hypervelocity cannon hits. The HVC does 6/6/12. Bulldog rolls R/W/B and gets 3/5/4, that's a total of 18 damage, reducing the Mason's side armor to 78, 30 shock, no effect, and 48 penetration against the Mason's penetration factor of 13, doing 35 points of internal damage. Looking along the Internal % chart, 35 is a 30% hit. The Bulldog rolls percentile and gets 22. 22 is marked off, 23-28 were destroyed last round, so the remaining 19 percentile points roll up and knock out all equipment between 29 and 48. A 20% hit does 2 hits of damage to all the equipment. Most equipment is destroyed with only one hit, but some equipment like engines and turret require more hits. The turret can only take two hits before being destroyed. The turret is locked forward. Pieces of equipment that can take more than one hit will have a hit # beside it. If an engine or turret doesn't have a hit number it only takes one hit to destroy it. Now the Rebels are going respond Notice that the Rebels are able to respond even though they have been shot. In the basic game combat is simultaneous. This assumes that damage isn't tallied and doesn't take effect until after the turn is done. This means that units damaged this turn can still fire back. The 1st Mason is going to fire his cannon at the Prescott. The cannon is Ballistic. The Prescott's front Ballistic is 11, no modifier for range. The Mason rolls a 6 on 2d10. The gunner has a gunnery skill of 4, 10 is a miss. The commander of the 1st Mason is going to fire 2 Type I Rocket Pods at the Bulldog. Rocket Pods are Ballistic, and are able to spread fire. The Bulldog's Ballistic Defense is a tough to roll 20. The Mason chooses to spread fire by 1. Type I's usually do 1/4/0. But the spread fire reduces each Type 1 to 0/3/0. So both Type 1's are doing a total of 6 shock dice, and nothing else. The reduction of the RP's damage means that the Mason's commander gets to roll an extra 1d6 when he tries to hit the Bulldog. The Mason rolls 11 on 2d6, and a 6 on the 1d6. This coupled with his +4 gunnery means he hits the Bulldog, but only with 1 to spare. The Bulldog's defense systems kick in, two Mark Pods. Mark Pods automatically hit RP's. When a Mark fires you roll 1d6-1 for each Mark. You reduce the dice of the RP's (Penetration, then Shock, then Damage dice, in that order) for what ever you rolled. The Bulldog's Mark rolls are 5 and 4, each minus 1 and that's a total of 7 dice reduction to the RP, which only had 6 dice. No Damage to the Bulldog. The Second Mason's gunner fires the 170mm cannon at the Prescott at a range of 12. The Prescott's front Ballistic is 11, +1 for range, minus 4 for the gunnery skill of the Gunner (Notice we subtracted from what has to be rolled to hit as opposed to rolling then adding the points, just to show you the different ways of doing things.) So the Mason has to roll a 8 or better on 2d10 to hit. The Mason rolls two 10's. All tens are added and then re-rolled. The Mason re-rolls and gets another 16. That's a roll of 36! (Now you see how it's possible to roll against huge numbers like Small Arms against tanks. It can happen to everyone once in a while but it's rare.) The Mason obviously hits. But since the Mason got a natural 20 he gets the lucky shot bonus. All D/S/P damage is DOUBLED. The Mason fired a Sabot round that normally does 7/5/12, now it is doing 14/10/24. The Mason rolls R/W/B and gets 3/2/3, doing 42 Damage to the front armor. 20 Shock to the Prescott's 16 Shock Threshold, (4 points of Internal) and 72 Penetration to the Prescott's 25. (47 Internal) A total of 51 points of Internal damage has been received by the Prescott. The Prescott is dead at 45 Internal. The Penetration alone was enough to kill it. The Second Mason's gunner wants a crack at the Bulldog. He spread fires just like his comrade. The RP hits yet again. The Bulldog has used up his Marks defending himself from the first set of RP's. 0/6/0 has to be rolled out. A quick roll and the Bulldog receives 12 shock. Against the Bulldog' 3 Shock Threshold, that is 9 points internal, 20% hit. Mason rolls percentile, 68-88 are gone. "J" is a fuel tank, leading to a possible fuel explosion. The Bulldog rolls 6, the Mason a 9. The Bulldog explodes. Note that had the fuel tank not exploded, it would have been destroyed anyway. Since the Bulldog has only one fuel tank, this would have effectively destroyed it anyway. It's just more fun to see it explode in mid-air sometimes. Aftermath Well clean up the UN forces that are all beat to poop. Round Three: Initiative (Or NOT) Well all that is left on the UN side is the Bison. Instead of wanting to fight he tries to surrender. He refuses to pick an Initiative chit. The Rebels aren't all too amicable. The Wallace rushes out and clubs the Bison on the front left side. The Bison has a Physical Defense Value of 11. The Wallace's Pilot with a Gunnery skill of 8, only has to not flub (2,3 or4) to hit. The Wallace rolls a 9 on 2d10. The Wallace's ***Scythe*** does 12/12/20. The Wallace rolls R/W/B and gets 3/3/3. This totals to 68 points of Internal Damage. The Bison is dead. Aftermath Set up another game with a few more units. Play again. Repeat as often as necessary. 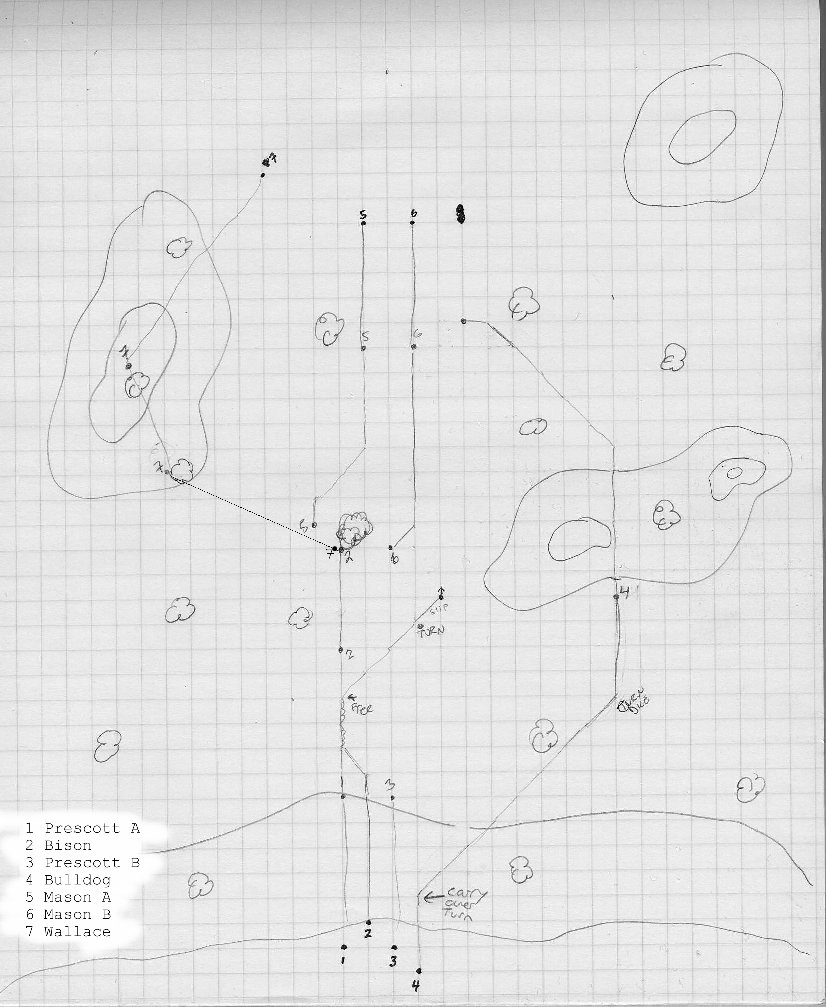
|